
 I am trying my best to have a handmade Christmas this year. This means making all my presents, decorations and cards. I can tick Christmas cards off my list, I'm doing quite well on the handmade presents which I will report on later and here is my first Christmas wreath. I made this at a Christmas Craft evening that was held at my sisters church. We were given a wire base to start with which was then stuffed with moss and wrapped with florist wire to hold it all together. I then took a long piece of ivy and wrapped that around to give it a bit more of a 3D look. I then used some fake red berries on wire to add a little colour with a couple of cinnamon sticks and red ribbon to finishes it off. I really enjoyed making this and I have always wondered how they were made. Mystery solved.
Sunday, 14 December 2008
My first Christmas Wreath
I am trying my best to have a handmade Christmas this year. This means making all my presents, decorations and cards. I can tick Christmas cards off my list, I'm doing quite well on the handmade presents which I will report on later and here is my first Christmas wreath. I made this at a Christmas Craft evening that was held at my sisters church. We were given a wire base to start with which was then stuffed with moss and wrapped with florist wire to hold it all together. I then took a long piece of ivy and wrapped that around to give it a bit more of a 3D look. I then used some fake red berries on wire to add a little colour with a couple of cinnamon sticks and red ribbon to finishes it off. I really enjoyed making this and I have always wondered how they were made. Mystery solved.
Monday, 8 December 2008
My Recycled Christmas Card Design

This is my Christmas card design for this year. I kept it quite simple and wanted to use recycled materials as much as possible. The silver card is from off cuts of food packaging from a local business. The blue printed paper is from envelops linings which I have been collecting from bills and letter over the past few months. I know a blue tree isn’t very traditional Christmas colour but with the silver back ground I think it gives a modern look
My brothers Christmas Present
 Well first things first I didn’t win the Folksy recycled Christmas decoration competition but I’m glad I took part. It was good fun trying to think of what to make.
This is my little bro’s Christmas present. (He doesn't know I have a blog so I don’t think this will ruin the surprise) He was given my granddad’s war medals when he passed away a couple of years ago and my brother has wanted to display them nicely some how for a while now. This is just a scanned image of the backing ground and the medals. I am presenting it in a black box frame so it has a 3D effect. The old newspaper and vintage flag I got from a local car boot. They are spray mounted onto the base of the frame and I think they really give it a vintage feel. I stitched the medals through the back of the frame so they were secure and so it didn’t damage them. I hope he likes it, he hasn’t noticed the medals are missing yet so hopefully it will be a lovely surprise. I am aiming to make all my presents this year and this is my first one. I hope I don’t run out of time!
Tuesday, 2 December 2008
Folksy Competition Second Entry
This is my second entry to the Folksy competition. The brief as I mentioned in my last post was to make a festive decoration out of recycled materials. Once I had made my first entry I still had quite a few ideas so as we weren’t limited to one entry I thought I would have another go. I think this one was slightly more successful then my first. I kept this design simple. As the competition was called Folksy Angle I thought why not attempt to make my own. I used a Champaign cork for the main body with the wings made out of a drinks can. I used a beer bottle top covered in a chocolate wrapper with some gold wire for a halo and legs. I made two of them so they can keep each other company. I think they look quite cute.

The competition deadline was yesterday and voting has begun today. I’m not sure how long voting is open for but I know it’s going to be very short period. If you would like to show your support then please go along to the folksy blog and cast your vote by leaving a comment at then end of the post with you entry choice.

Friday, 28 November 2008
Folksy Angle comp
It has been a while since I posted, not because i've been lazy but because I have been the complete opposite. I had a craft stall at the Christmas faire of the school I work at and it was my boyfriends birthday. So I've been busy making all sorts. I will hopefully take some photos of all I have created so you can believe me. To start off with this is my Folksy Angle competition entry. The brief was to make a christmas/ festive themed decoration using recycled material only. This was quite a challenge but my saving grace was the fact I am a huge hoarder. I never thought I would say that was a good thing, but my stash hopefully has payed off. I made a Merry Christmas plaque. I used a piece of old fencing as a base and a zip as a hanger. The holly has been made from old book pages with vintage button berries. The Robin has been made from an old pair of linen trousers and left over fabric from a pair of curtains I have made in the past. The text was printed on scrap linen with an antique printing set. The closing date is Sunday so fingers crossed.

Friday, 31 October 2008
Happy Halloween
 I have been unbelievably organized this year when in came to sorting out my halloween costume . Here is a quick photo I took this morning just to make sure my costume looked ok. I actually made it about a month ago but still hadn't tried it on. This year I am going as a pumpkin. I wanted to go as something a bit different then a witch and I am loving the colour orange at the mo so I thought perfect. I appliqued the pumpkin face onto a long sleeved t-shirt and then made a tu tu style skirt to go over some black trousers. I will get some better photos when I go to my friends house party tonight. It's quite hard to take a full length photo of yourself, by yourself.
  I also made a spooky chocolate take to take along to the party. I just made a simple stencil out of foil and sprinkled the cake with icing sugar. Now I just have to cake down to Devon in one piece on the train and then it's party time. Yeh!
Monday, 27 October 2008
Banksy in Bristol
 Went to Bristol on the weekend to catch up with a couple of friends and managed to catch sight of some Banksy on my travels. I do love his work.
Wednesday, 22 October 2008
Car Booty
 Here are a few pictures of the goodies I came away with from my local car boot at Cheltenham racecourse. I love this car boot and recently it has been worth giving up my sunday lie ins. This week I managed to pick up a lovely collection of vintage mother of pearl buttons, at least an inch wide. I'm going to use these as center piece for my vintage button necklaces. I also picked up a couple of old family photos of a wedding. These were only 20p and i felt very sad that someone's happiest day of there life has ended up in a car boot! Hopefully i can give them a new lease of life in one my ephemera collages.
  I also managed to buy a couple of wills, one is dated 1803 and I think the other one is dated earlier looking at the handwriting but I can't seem to see any date. The handwriting on the will pictured below is fantastic. The will has been slightly damaged due to age but style of handwriting is stunning. No one ever writes like this any more. However I think I know why....... I have found it almost impossible to read. I'm not sure what i'm going to do with them but I just love the writing.
 The second will belonged to a Rev John Bell again amazing handwriting and legible. It's quite strange reading someone's will but you do learn a lot about someone from it
 I will keep you posted on what I do with all my goodies.
Saturday, 18 October 2008
Fish Eye
This is a photo I took with my new fish eye Lomo camera which I got for my birthday back in June. It has taken me this long to develop the film which is disgraceful. However it was a nice reminder of all the things I did over the summer. This is me and my sibling at the O2 festival in London. There are five of us in this picture and you can just about make us all out. If you love cameras especially the ones that use good old 35 mm film then check out Lomography cameras. It’s just about having fun when taking a photo. I love it.

Wednesday, 15 October 2008
Print Workshop Part 1


 I did a print workshop a while ago now but have only recently looked over what I did and learnt. These are some background surfaces I prepared for further working on which I scanned in so I could track my progress. I always get scared about ruining what work I have already done but this course taught me to go for it and good mistake can happen. I used inks, acrylic, wax and bleach to create textured bases which I worked into further. I will show you what the final outcome of the workshop was in my next post. I kept to a very simple palette to start with as I didn’t know where I was going to take it when we started mono printing and using a technique with gum Arabic. Watch this space to swee the results.
Monday, 13 October 2008
Innocent Smoothie The Big Knit
Once again I have been busy crafting but not busy blogging. Well these little hats are all going towards the Big Knit which has been created by Innocent Smoothies to raise money for Age Concern. For each hat you knit they will donate 50p to age concern. My mum has done this a few years running now but never passes on the info in time for me to participate. I managed to find out just in time this year and was able to knock out 10 in one week which is pretty good for me as I’m not a big knitter. I’ve tried to make each one different by stitching into them or adding beads and buttons. I only had three wool colours so though I had to make look a little more individual. It was quite good fun and I will defiantly take part next year as well. It’s great being crafty for charity.

Wednesday, 3 September 2008
Vintage Paper Collages
Recently I have been collecting a lot of ephemera which I have picked up from car boot sales, charity shops and used book stores. I thought it was about time I started to have a play with what I'd collected. I had also bought a couple of small prestretched/prepared canvas which I was planning to paint on but the thought of that still terrifies me so I thought why no try a collage. These were all just made up as I went along, I had no real plan. I think I like this making process, for me, if I think about something too much I'm scared to try something new in case I ruin what I've already done. That's why I think using recycle materials is great for me as well as I know i haven't spent huge amounts of money if it does all go wrong. Plus i love old worn faded bits of paper, it's like your giving them a new life. The picture bellow is the first collage I did it's 5 inc by 7 inc. I used some old music, part of a dress making pattern and some paper made from tobacco. I also love buttons and recently came across a jar in an antique shop which was calling to me so I thought I would include some to add some colour. I just wanted to play around with the composition and look at the positive and negative space left from the layering of the paper for this first one.

I was quite pleased with my first attempt so decided to try a bigger image 8 inc by 10 inc this time. Again I had no real plan but wanted to include some coloured and pattered paper. I also tried some subtle stamping in gold which doesn't show up well on this image. I also introduced some ribbion at the bottom with some ricrac for more colour. This image seemed to develop into a scene of flowers soaking up the sunshine which I love. This was all made up of recycled paper including the flowerd which were on the back of a letter from my band would you believe. They look quite retro. I do love the colour combos.
 This canvas was a small one 5 inc by 7 inc again. I wanted to include a little more stiching on this one so started with a very simple background and started to introduce some vintage maps as well. I love that even though you are using very symilar technquies you get a very diffrent look to each canvas. I'm definatly going to be making more of these as it quite relaxing and you can really take your time building an image.
Monday, 1 September 2008
Felted owls and a Westie brooch
Well I haven't written anything recently but that doesn't mean i haven't been busy making things. I have been having a go at needle felting with some cute results. I touched on felting when I was in Uni and my sister said she really wanted to have a go so I thought I would share my knowledge and have a felting day. I now remember why I didn't carry on with the felting. It is hard work and quite time consuming with the needle felting. I did enjoy it but do think you need a fair bit of practice before I would be happy with what I produce. Here's the fruits of my labour, my little owl which kind of looks like a penguin as well.

It was also my mum’s birthday recently and she recently got herself a Westie called Pepper. I saw these cute buttons while I was on holiday in West Wales so I thought I would use the to make her a brooch. I thought I would try and give the brooch a cameo style look so cut the base felt into rounded scalloped edges and then layered some red over the top with ruffled blue and green tartan ribbon underneath and stitched it all together. I’ve been doing a lot of embroidered writing recently and thought I would add the words walkies onto the brooch so it kind of looked like park of the dogs lead. It was quite small but you can still read t. My mum was very happy with it and it’s got me to make a few more brooches which I play around with some new embroidery techniques.

Monday, 4 August 2008
At last I'm mastering the computer gremlins

I'm still having slight problems loading pictures onto any internet application but I'm slowly getting there. I even managed to list something on Etsy today, one of my birthday cards. I seem to have quite a stock of things for the shop now but just need to have a major listing session. I trying to find a balance between being creative and the amount of time I spend on the internet/ trying to use my computer.
Sunday, 3 August 2008
sunflower 4/365
I seem to be having a lot of technical difficulties at the moment uploading photos onto my blog using my new laptop. I have now sorted out the gremlins I was having using Flickr uploader so I thought I would share a little bit of sunshine with one of my sunflower that I planted in April. They have taken quite a bashing with the weather and i never thought they would flower.

Monday, 28 July 2008
Can you tell what it is yet?
Now I think this is the most eccentric present I have made so far. It was my friend Lisa’s birthday and she had mentioned a while a go that while travelling she and her boyfriend had bought a Didgeridoo in Australia. When I last went to visit her she had mentioned when she bought it they had all been displayed sat in cut off tree trunks. When she said this I thought perfect I fancy a new crafting challenge and that’s what I got. My first task was to plain the top of the wood down smooth then chisel out a hole in the centre for the didgeridoo to sit in. I spent an afternoon covered in sawdust but just wasn’t getting much headway on craving the centre. So I had to see some technical assistance. This involved using a large drill bit and just breaking up the wood so it would be easier to carve. It worked. I did really enjoy this project but it was quite a physical one. I made a small plaque/ label out of copper tape and the oxidised it for a nice antique look. It’s not very exciting put the good news is she loved it and said I was very thoughtful. Mission accomplished.
 Lisa also got engaged while in Australia and so I decided to make her a wedding planner as well. Lisa had started to look into venues and is thinking 2010 is the year so I hope this will help her keep all her research in order. I used a dull lined note book and covered it fabric. I then made bookmark dividers out of ribbon to divide the sections of what she needs to plan. I will post some photos of the detail a little later but here is the front cover for now.
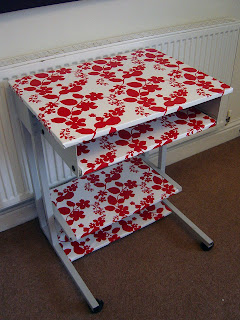
Sunday, 27 July 2008
My new crafting table
At last I have my own laptop. Yeah me! Now I don’t have to wrestle with my boyfriend to get on the internet and I kind of feel like I'm channeling Carrie Bradshaw as it is a nice shinny Mac Book. This kind of all ties in with my latest crafting project to kind of refurbish an old computer table that was not needed at the school I work at. I’ve been looking for a potable work table which I can have in our living room. My plan is to use the table for my crafting projects, I can then quite happily leave things out on the table but they tuck this into the corner of the room out of the way.
Before:

After:
I used oil cloth, cut to size and just stapled it on the underneath for a quick but practical revamp of a very dull table.
Friday, 25 July 2008
Zip flower brooch
Well at last I have started to list items on my Etsy shop again. It has been a while. The mad thing is I have been making things everyday but have yet to list ( it doesn’t help that my boyfriend hogs the computer, it is his but that’s my excuse and I’m sticking to it). So I came up with this idea to make flower brooches out of zips. I have had these 50cm zip for ages and just haven’t known what to do with them. There was no way I was going to start knocking clothes out with them (I would love to but just wouldn’t know where to start) so had to think of an alternative use. I’m very happy with the way they have turned out and have had some very enthusiastic comments already. 
 I have made them in 3 colours and they are in me Etsy shop now. This is the second time I have listed items and have been working on my photography which I think is a key part of your Etsy Listing. I hope to make at least a couple of sales.
 I have made them in 3 colours and they are in me Etsy shop now. This is the second time I have listed items and have been working on my photography which I think is a key part of your Etsy Listing. I hope to make at least a couple of sales.
Wednesday, 23 July 2008
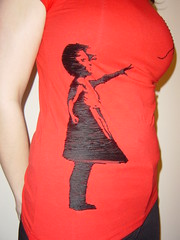
Banksy t-shirt
This is a project I did a while ago. This is a Banksy graffiti designs of a girl reaching out for a heart shaped balloon embroidered onto a t-shirt. It took me forever. My boyfriend had made a stencil of the design to put on a canvas for a friend. However I borrowed it to get the outline onto the t-shirt. I used regular spray paint to mark it out with (I need to invest in some fabric paint). I then embroidered into the sprayed design using satin stitch and embroidery thread. I do love this t-shirt but it did take me a while due to all the detail. But I got a mention on someone’s blog who liked what I had done, so thanks Blog-standard.
Tuesday, 22 July 2008
I'm rubbish
Well I think its official I am the worst person at blogging, ever! Well I don’t really have any excuses. The good news is I have been very busy creating all sorts of exciting things but I just haven’t been documenting any of it. I have now joined the flickr group crafting 365 so now I have no excuse for not posting regularly. I am crafting everyday and researching new projects daily so as you as my witness I will try to be better. I now have a good stock of things to go in my Etsy shop as well but again haven’t got round to listing them which is probably why I haven sold anything, makes sense. So please watch this space.
Wednesday, 23 April 2008
 Everyone seems to be moving house at the moment. I quite like the idea of moving house but I’ve done it enough now to know it’s very stressful and I never end up with enough room for all by belongings! Anyway I thought I would make a couple of cards as a little house warming for my friends. I’m trying to be a little more inventive with the materials I use to make my cards as I do seem to have quite a collection now. I really love these little houses I’ve made and I’m quirt tempted to make a little paper and fabric town. These are the type of houses you used to draw as a kid. I don’t think I’ve ever seen a house like this but I think there quite cute and simple.
 Annoyingly this image doesn’t seem to have scanned as well as the other but I think you can get the idea.
Wednesday, 12 March 2008
Butterfly Birthday
 Another birthday = another card. This one was a little last minute.I knew the birthday girl loved butterflies and I have wanted to try out a bit more paper cutting and thought this would be perfect. It was a little bit fiddlerly. It must take a lot of patience and practice to create huge fine paper cut. I have a lot more respect for anyone that works like that with paper. I think the hardest part of this card was making sure the wings mirrored themselves. The butterfly is actually 3D, I trapped the fabric between card to give it a clean finish and then glued it in the centre. I think I’m going to try a paper cutting design on a much larger scale now and see what happens. I think it boils down to patience and practice.
Monday, 25 February 2008
Russian Doll,Matryoshka doll, Lino Printing, Mothers Day

As I said in an earlier post I had made a lino cut of a Russian doll. It has been years since I have done lino printing so I was a bit worried it would look as if a small child had done it. In some ways that does look like the case, but I do like the primitive simplicity of the design. Once I got my head round positive and negative space I was well away, and only managed to stab myself once which I think is an achievement for me. I never seem to learn.

As it is mothers day I thought I would try printing some cards. The only problem was I didn’t have any printing ink. I tried using black acrylic paint which kind of worked but the prints were coming out patchy. I had some PVA glue to hand and tried mixing that in with the Acrylic and it worked. I know I’ve probably committed some printing faux-par but with the amount of art materials I already own I’m sure I’ll be let off. I then thought I would embellish the print to add a little colour and make it a bit more mumzy by adding some flowers. I do think it’s quite sweet and might print some for my Etsy shop.
Sunday, 24 February 2008
Valentines Day, Banksy, Stencil Graffiti
 As you know Valentines Day has been and gone and my boyfriend and I decided not to spend silly amounts of money on each other. However I did want to get him a little something and I noticed he seemed to be loving the graffiti artist Bansky at the moment. My plan was think of how I could make my own version of one of his pieces.
I thought I would have a go at embroidering the image. It’s a very clean, simple image and I knew I would have to get it right or it would look rubbish. I transferred the image onto some fabric by printing out the image onto the wrong side of some acetate and pressing the ink on to the fabric. It wasn’t 100% perfect transfer but I went round the out line with a pen to make it clearer then stitched into it with embroidery silks.
I then made a wooden frame and stretched like a canvas. He was very chuffed with it which made me happy and I might try it on a t-shirt as well as it’s one of my favourite Banksy pieces as well.

Here is what the original Banksy stencil graffiti piece looks in real life. I’m not sure where it is located but if you love stencil graffiti and you have a sense of humour just Google Banksy and look at his other work, it’s amazing.


I have also been having a go at stencil graffiti myself. I saw a great video clip on how to make them from Google-ing stencil garffiti, check it out www.metacafe.com/watch/286400/how_to_stencil_graffiti_art_101/ it was very easy to follow even if you don’t know how to use Photoshop. I had another friends birthday coming up and she loves this British comedian Justin Lee Collins so I thought I would make her a pop art style canvas print/stencil for her. It was a lot harder than I thought. You have to really simplify the image that you are going to work with on Photoshop, so I hope he is still recognisable. I did love doing this and feel there is so much potential if I have the patience cutting out the stencils, it did take quite a while. I have also included the original photo I used for you to compare, any comments would be greatly appreciated.
Friday, 22 February 2008
Resin, Envirotex Lite
 This was another little project that I wanted to have a go at for quite a while and something I possibly translate within my jewellery making. I haven’t done any work before using resin but have seen some amazing pieces that have been commercially made and handmade. I love the idea of trapping things and making almost like permanent shrines. I did a bit of research on the net and didn’t find huge amount but did come across a website which has loads of art/craft related project and ideas you could try. The link is http://www.art-e-zine.co.uk/resin.html and it has a step by step guide to what you need and how to use this resin. You should defiantly check out the other projects as well on http://www.art-e-zine.co.uk/newstuff.html the site has been running for a couple of years and there seems to be new projects every month.
These are just my fist try and they are not perfect. I have used a range of materials like playing cards, old books, buttons, glitter and other random bits and pieces. Some of the papers I have used have gone a bit see through, you can still see the text but you can also see what is printed on the reverse. It’s quite interesting but
 something you can’t control. I did seem to mix far more resin than I needed, it does seem to stretch quite far. I do think there is a lot of potential within this process and defiantly something I’m going to play around with. It could defiantly do with a lot of refining. I thi
 nk I’m going to turn these into drawing pins and a brooch but I have also seen them made into pendants. These were made from bottle tops but you can use anything with a little depth. I even tried a small shell.
Thursday, 21 February 2008
The Book of Good Needlework
 I've strated to do a lot more textile work at the moment and remembered seeing a very old needlework book that used to belong to my gran. I though it might be worth having another look at. Even though I have done a contemporary textile degree I never really felt I had covered the basics. I only really played around with cross stich when i was younger which I find very controlled. So I thought I would see if i could learn some basic stiched which I could then experiment with. The book was very much aimed at the lady of the house but with some great information and illustrations.
Here is a mini sampler i did just having a go at Stem-Stitch, Back-Stitch, Outlined in Buttonhole-stitch, Chain-Stitch, Buttonhole-Ring Stitch and Satin-Stitch. It's not really much to look at at the moment but I'm trying to keep a record of every thing that I am trying so this blog is almost like my sketch book. I loved the designs where areas were cut out to make a lace like design which is something I'm going to try next. Techniques like this i feel don't date you just have to adapt the designs you use.

Here is a little russian doll brooch I made. It's quite small, I didn't realise how fidderly it was going to be but it has turned out quite well and very cute at 3.5cm high. I used acrylic felt which does seem to have malted a little bit but i do love felt for little projects like this.
I'm loving russian dolls at the moment and have also made a lino cut of one but don't have any printing ink yet to road test it. I will keep you posted.
Wednesday, 20 February 2008
Etsy, DuckDownDesigns
AT LAST! Well i have finally got organised and have set up my shop on etsy. I don't know why it took me so long as I have been addicted to this site for at least a month or two now. I have set up my shop with the name Duck Down Designs. This is a name my boyfriend came up with. My surname is Duckworth and I have had numerious nickname through out my lifetime so why not embrace the Duck in me. So Duck Down Designs has been born. Please Check out my shop at http://www.duckdowndesigns.etsy.com/ . I am concerntraiting on selling my Jewellery designs at the moment so please check it out and let me know what you think.
 I have always loved those flying ducks that seemed to be around in the 60's and 70's and thought it would be quite fitting. I found a picture of a flying duck on google images and made a fabric collage of it.

I then scanned this into photoshop and had a play around. It didn't take as long as I thought and I'm quite happy with the finished article. I think it definatly make a diffrence to the apperance of the shop and thought I would use it for my blog heading as well.
As i had the shop up and running i wanted to work on the shops apperance. I have been quite envious of some of the amazing banner heading that others have on there shop and so thought I would set out at making one myself. Here is the finished article.
I have always loved those flying ducks that seemed to be around in the 60's and 70's and thought it would be quite fitting. I found a picture of a flying duck on google images and made a fabric collage of it. 

I then scanned this into photoshop and had a play around. It didn't take as long as I thought and I'm quite happy with the finished article. I think it definatly make a diffrence to the apperance of the shop and thought I would use it for my blog heading as well.
Subscribe to:
Posts (Atom)

